Friday 21 July 2017

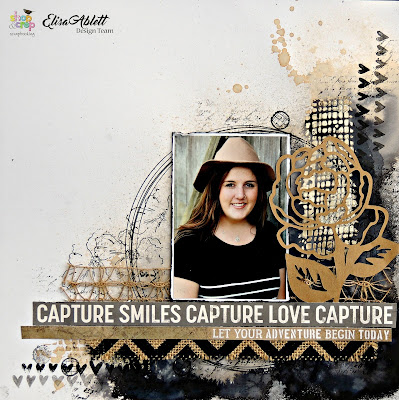
'Sweet' and 'Beautiful' by Elisa Ablett

Hi everyone,

It was my turn up on the Shop and Crop Scrapbooking blog today with two mixed media layouts so I thought i'd share here on my blog as well.

......

Elisa here from the design team with my latest layouts for Shop and Crop Scrapbooking

I grabbed out the leftovers from a couple of recent kits which I created (links underneath the photos) for Shop and Crop Scrapbooking along with some other items from my stash. 

The first layout below is called 'Beautiful' and uses the leftovers from Expo Kit 3 ( https://www.shopandcrop.com.au/collections/monthly-kits/products/expokit-no3?lshst=collection) and Colour Blast Shimmer Cube in Sunshine along with Lollipop Colour Blast Shimmer Dusts.


I used the Kaisercraft 'Mandala' Die to die cut the lovely patterned vellum from the kit, plus I used Lollipop Colour Blast Shimmer Dust for my  background ( i also used the leftover liquid to add colour to the butterfly diecut and the feathers) as well as the "Sunshine" Colour Blast Shimmer Cube (which comes in the kit) I painted the chipboard title with the Sunshine Shimmer Cube as well as the inside of the butterfly and feathers.


Expo Kit 3 - Beautiful


And my second layout is called 'Sweet' 

This layout is created using the leftovers including the paints, papers and custom made stamp from the June Mixed Media Kit which can be purchased as a one off kit from Shop and Crop - https://www.shopandcrop.com.au/collections/monthly-kits/products/june2017mixedmediamaniakit-oneoffpurchase?lshst=collection

 So to create the background, I used the blue and yellow paints from the kits and a piece of plastic and a small spray of water from a spray bottle and 'smooshed' paint onto the page using a piece of plastic like a sponge. Dry thoroughly then using an archival ink pad and your custom made stamp stamp a strip of graffiti up the page leaving about 1.5 inches on the right hand side border to add your two strips of paper.

After that I used a black marker and a small entree plate and created circles on my page to create a frame for where my photo was to go. Colour some chipboard arrows with your yellow paint and stamp on your chipboard pieces as well. Don't be afraid to add a die cut to cover part of your photo.


Here is the original kit which is available for purchase from Shop and Crop on the below link.


Well that's it from me today, I hope you have been inspired to pull out those old kits and use your leftovers to keep creating....The kits are so chock full of product you can still create loads of layouts with a little help from your stash...

Elisa xx


Wednesday 19 July 2017

'The Blue Divide' Art Journal Page by Elisa Ablett

Hi Soul Sisters, 

Elisa here from the design team for Art and Soul Studio with my latest project which I based around this month's soulful project quote.

 the link to the facebook album is here for your entries - July Soulfull

there is a $75 voucher to the store up for grabs so get your entries in.

Image may contain: text


Here is my project, a very personal mixed media art journal page inspired by the quote and featuring products from Art and Soul Studio Store.

To me it symbolises the swirls of thoughts through our brains, the struggle between anxiety and panic and happy cheerful thoughts. How something so beautiful as your brain can be a little dented and scratched, so to speak .... 


Here is a close up of the thoughts, words cut from an old book.


I wanted to show you how I achieved my page using some of the materials from the store.


Step 1 - Using a new Mixed Media Journal from X-press It, it has beautiful 300gsm aqua paper! draw a face silhouette with a waterproof black marker, add a circle and line down your page where you want to showcase the line drawn between your thoughts in your head... (more symbolism)


Step 2 - Grab your desired colours of acrylic paint - I used Vicki Boutin Mixed Media Acrylic Paint available from the store on the link below. The colours are glorious! and it spreads like margarine.
Using a palette knife or silicone spatula spread the three colours inside the circle on your page and let dry.


Mixed Media Acrylic Paint 1.7oz 4/Pkg: SET 2


Step 3 - Using an old sheet of music paper and a sheet of patterned paper (Abstract Art by Kaisercraft - Basecoast 4 collection) tear small strips of the papers and use to build the silhoutte's clothing on the lower half of the page plus also part of the background on the right.


I also used the patterned paper and using a new bohemian flower die from the store, I diecut my flowers and put them aside for later.

Cherry Lynn Designs - Mehndi Botanicals 4


Step 4 - Using a paint brush add a small wash of gesso over the top of your patterned and glued paper to dull the colours a little. Then grab your favourite watercolour inks and spray bottle and a paintbrush add colour to your silhoutte page on the right side. I used the FABULOUS ecoline inks available in store individually or in packs of 6 or 10 colours. - 

Ecoline Liquid Watercolour: SET OF 10


Step 5 - Use a large paintbrush and water as well to add a wash affect over the top of your inks.


Last steps - Once your page has dried and you have added all the colour inks you want, using a versafine inkpad which is archival, stamp around your circle and line to create depth on your page. 

Also add your title, either handwrite or use stamps as I have using the same black versafine inkpad.


To finish - add your die cut flowers, eyes that i ripped from a magazine and some important words from an old book to represent the war our brain sometimes has when we are anxious, sad and confused and stressed.


Add some finishing touches like colour to the lips or outline your flowers to give them more depth.

And you are finished!!

Hope you have enjoyed my project and the tutorial, the quote immediately 'spoke' to me and I wanted to create a page that symbolised the real struggle that a lot of people go through with the warring thoughts in their minds. Art is Therapy.....

Make sure you leave me some love and head on over to the store to check out the amazing products the store is stocking to help you on your artistic journey...

Elisa xx


Tuesday 18 July 2017

'Beautiful' by Elisa Ablett

Hi D-lish lovers,

Im up on the D-lish Blog again with another mixed media layout! Here is the post below - 

Elisa here from the design team with my latest layout for D-lish Scraps, a mixed media layout chock full of gorgeous D-lish goodies.

My background was created with thick Mixed Media cardstock (a must), Candy and Paris Colour Blast Shimmer Dusts and a 'Pear Tart' Irresistible Spray and some stamping using Prima Ink and Layer stamps plus stamps from Aall and Create.


Let's take a look at the D-lish goodies on the layout!


In the main cluster on the page I layered Red Cabbage Roses, Washi Tape, Red Sequin Heart, a journal strip from the latest 'Just Add Paper' Kit - Primrose-LaneCreative-Cuts - Roses, lime green gauze and lime green flowers from a previous Just-Add-Paper-Kit , and a chipboard film strip. I also embossed a Kinder-Kreations - Beautiful Chipboard Title in white to match my page.


In this second cluster there I feature the gorgeous Rose Creative Cuts'Just Add Paper' Primrose Lane Red Cabbage Roses, Washi tape, Journal Spot and Red Flair Button. Plus a little more of that lovely lime green gauze. 

On both my clusters I have added some plastic green 'look a like' leaves I had in my stash, I picked them up from an op-shop a long time ago and never used them.


The lovely Creative cuts look fantastic against the coloured background ! They are so versatile, you can colour them or leave them plain.

Make sure you head to the shop to check out the bargains in the Clearance Section.

That's it from me today, I hope my layout inspires you to try something different with your D-lish Stash.

Elisa xx


Friday 7 July 2017

'Let the Adventure Begin Today' by Elisa Ablett

Hi everyone, 

Just popping in to share my blog post from the Shop and Crop Scrapbooking blog from this week.

The first project that I have to show you is a 'collaborative' art journal page that a few of the design team and myself completed at the Brisbane Expo. Each team member had their turn at adding a layer to the page, at this stage we don't know what quote or title we should finish our project with....perhaps you might have some suggestions for us.


Here are some close ups of the finer details and products - 

Products used : Lindy's Magical Shakers, Carabelle Stamps, Kaisercraft Mandala Stencil, Gel Medium, Kaisercraft Script stamp, Nuvo Embellishment Mousse and other assorted products. 


Here are a couple of pics of our collaborative team putting the journal page together at the Brisbane Expo - myself, Tanya Froud and Heidi Williams.

Image may contain: 2 people, people smiling, people sitting and indoor

Here I am demoing some of the awesome distress oxide ink pads!

Image may contain: 2 people, people smiling, eyeglasses

Tanya Froud and myself with the finished art journal page.
and 

Heidi on her lonesome, smashing out some demo's.

Image may contain: 1 person, smiling, sitting and table


And my second share of the night is of my challenge layout for this months inspiration board.

Here is the July Challenge graphic....

Link to facebook group and album for your projects - https://www.facebook.com/media/set/?set=oa.466817816985021&type=3


and here is my layout! I went with the colour scheme from the board to create my layout.


Some close ups! the cut file is a Neat N Crafty Cutz, the paper is from a recent Kaisercraft Kit called High Tide from Shop and Crop Scrapbooking.


Background stamping is a Prima Ink and Layer Floral Stamp!


Well that's it from me today, thanks for visiting the blog, make sure you leave some love xx


Elisa


Thursday 6 July 2017

'Life is Wonderful' by Elisa Ablett

Hi everyone,

July is here already! and with the start of the new month there is a NEW challenge up over at Kraft Plus challenge blog. This month the challenge is Roses 3 ways. Just grab all those Rose papers, embellies, stencils and well....you get the picture. Roses Roses Roses 😁

Here is the challenge graphic and the link to the challenge at Kraft Plus.


Current Challenge

and here is my layout.


Roses 3 ways - Rose Stencilling, Rose Die Cuts, Rose embellishments and Rose Papers so maybe in my case Roses 4 ways.  My Rose cut files were a RAK sent to me by my friend Tanya Froud as I don't have a Cameo or anything fabbo like that, thanks lovely 💓💓

and some close ups!


That's it from me today ! Make sure you leave some love.

Elisa xx


'Frosty' by Elisa Ablett

  Hi Crafters, Elisa here from the design team for Ink Art Designs with the first of my 'Christmas in July' projects. For this proje...