Hi everyone,
My turn on the Colour Blast blog today with something a little left field...
A bohemian inspired Oil Burner!!!
Yes you heard right.....
I had an old terracotta oil burner hanging around, i think it was an old op-shop buy and I thought about 'jazzing' it up with Colour Blast products.
At first it was an experiment because I wasn't sure how the Pastes and sprays would go on the terracotta, but they worked a treat I think. It has retained all the shimmer and shine and was so easy to use!
Here is the final photo of the Oil Burner and i have included a tutorial on how I achieved the Bohemian look or hippie-chic with a romantic shimmering floral design, feathers, twine and beads.
and now for my tutorial -
Below is a photo of a few of the Colour Blast Pastes and Sprays I used to complete this project - Tangereen Dream, Bling, Deep Water, Envy, Royalty and Just Blue Pastes and Shimmer Sprays can be found here.
To start I cleaned the burner thoroughly and then once dry I sanded the burner back to ensure a smooth clean surface to apply my black acrylic paint.
Next step after it has dried thoroughly is to grab a few smaller stencils, preferably stencils that are very flexible and even better if they have an adhesive back. Because of the curve of the burner, larger thicker stencils would not work at all.
As you can see from the photos directly above and below I have used different flower stencils to create a flower background design. I have washed and dried the stencils between each colour Paste.
Also you can definitely see the amazing colour and shine on the black background.
I must point out here that the top of the burner (where the oil and water goes) was already glazed with what i assume is a glossy heat resistant coat, I am not sure what they used as I bought the oil burner like that. Just make sure if you are attempting a 'revamp' of something that uses a flame and oil that you seek professional advice from a Hardware or Garden Store.
The next step is to use the Shimmer Sprays, at first I sprayed a light coverage of different colours over the black background. Then after that had dried I took the tops of the sprays off and used a paint brush to pick up the intense colour from the bottom of the bottle and let it drip down into the design. You get an amazing marbled look almost like an Opal.
After you have added your intense coloured drips, please dry thoroughly and then use your choice of a quality Ceramic sealer, or an Acrylic Sealer, Matte or Glaze.
I used Gel Medium and Super Tac Glue to add the thick Garden Twine, this twine has a rough hessian feel to it, once you have a layer of glue down slowly twirl your burner as you gently press down the layers of your twine.
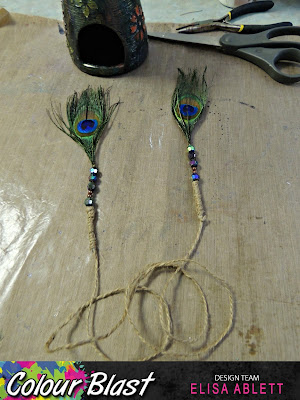
Next iImade the bohemian style 'lariat' which is a necklace or length that does not have a clasp, you have to knot the two ends together. From the photo below you can see I cut the feathers down and stripped them of a few inches of the thin smaller feathers from the length, I then added a stopper near the head of the feather and added my beads. I then put glue on the end of the feather where my twine was to go and slowly wound and twisted the twine in a spiral to finish off the ends of the feather.
Here is a finished photo of the Lariat to finish off the burner.
And some more photos of the finished product after winding and tying the Lariat around the burner. Safety first people!!! Always watch any oil burners or open flames around your house.
Thanks for stopping by today, I hope you have enjoyed my tutorial.
please leave some love in the comments, we love to hear from you all.....
Click on the link below to discover all the amazing colours for the
Colour Blast Pastes, Sprays and Embossing Powders


