Showing posts with label Katzelkraft Accessories Stamp Set. Colour Blast Watercolours Set. Show all posts

Thursday, 23 July 2020

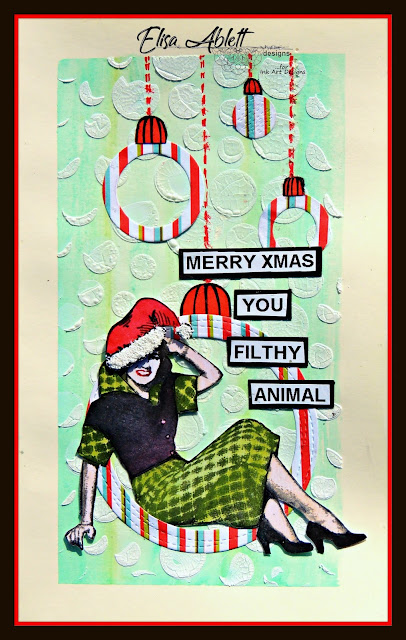
Merry Christmas by Elisa Ablett


Hi all, 

My turn to share a project for Ink Art Designs today and as it's still Christmas in July over at Ink Art Designs, you can see I went with another Christmas design along with a far bit of snark !

I started this art journal page with a pastel watercolor wash in the background along with a white crackle paste stenciled bubble design.

I have been working in my small 5x7 Dylusions Art Journal and I have been converted to using washi tape to tape around the edges to create a border for my design. Just looks a whole lot neater !

The main stamped image is from Lost Coast Designs Stamp Company and you can find their stamps on the Ink Art Website. I just love this 50s girl, so versatile and looks fabulous on any stamped project.

Let's take a closer look :-) 


Add some die cut circles as Christmas baubles and a great snarky quote!

Here are the products used from Ink Art Designs :-


and that gorgeous Snow-tex from Decoart


Thanks for stopping by the blog today, make sure you leave some love

Elisa x


Saturday, 11 July 2020

Merry Freaking Christmas by Elisa Ablett


Christmas in July !!
πŸŽ…πŸŽ…πŸŽ…πŸŽ…πŸŽ…πŸŽ…πŸŽ…πŸŽ…πŸŽ…πŸŽ…πŸŽ…

Hi everyone,

My turn to share inspiration for Ink Art Designs and we are creating all sorts of Christmas in July projects this month.

For this snarky Christmas card I used a couple of Katzelkraft Stamp sets including the new Owl set and you can't go past the Accessories stamp set to add those seasonal elements to your Katzelkraft stamp sets - making them even more versatile!


I used a great product from Decoart, its called Snow-tex, it creates a snow like texture on your projects and I love using it on my Christmas and winter creations.

To create my snarky scene, I first stamped the owl and christmas hat and branch and used a small round brush and my trusty Colour Blast watercolour set to add colour to my stamped images. 

I rummaged around in my 'Christmas paper box' and found a couple of off cuts of christmas scrapbooking paper that I thought would make the stamped images pop!

Here are the products used from Ink Art Designs along with the links.


That's it from me today, thanks for stopping by the blog.

Hugs 

Elisa x

Sunday, 26 April 2020

#IADAnimalChallenge - Join in the Challenge with us this month at Ink Art Designs


“The # Animal Challenge has started at Ink Art Designs.
Image may contain: sky and outdoor
The #IADAnimalChallenge rules are as follows ...

* Create any project (card, art journal page, canvas) using the theme ANIMALS. This can include birds, insects and sea animals.
* Stamping must be the main focus of your project.
* Use stamps from Rubber Dance, Visible Image, Lost Coast Designs, Darkroom Door, Lavinia, Crafty Individuals, Art By Marlene, That’s Crafty, Art Journey or Stampotique.
* Share your project on social media - Facebook, Instagram or Pinterest - with the hashtag #IADAnimalChallenge
For more details about the challenge, the prize package as well as the discount code for all participants, visit our Ink Art Designs #IADAnimalChallenge post HERE:
Ink Art Designs will select a random winner for a grand prize package which will be announced on the 9th of May.”

Now it's my turn to share what I have created for the Challenge... a bright and cheeky art journal page.


It features Katzelkraft's Farm Animal, Accessories stamps 
and Art By Marlene's Sticker Book;


Here is a close up of the stamping featured in my project:

Thanks for stopping by the blog today, 
Make sure you hit the link above to head to the Ink Art Designs blog post about the challenge for all the challenge details and a squiz at the prize pack!!
Hugs
Elisa Ablett

Sunday, 22 December 2019

Christmas Ornament by Elisa Ablett


Hi Stampers,

Elisa here from the Ink Art Design Team with my last post for the year! In keeping with the season, I decided to make a funny Christmas Ornament using Katzelkraft stamps from the store - https://www.inkartdesigns.com/product-category/stamps/stamps-stamps/

Before I continue I would like to wish you all a Merry Christmas, happy holidays and best wishes for the New Year.

Hopefully you will all get a chance to create and get Inky over the Christmas break, so don't forget to get your entries into the Ink Art Stamping Playground December challenge album - https://www.facebook.com/media/set/?set=oa.2549149125321173&type=3

Here is my step by step for those wishing to see how the ornament came together!


1. Stamp on thick mixed media white cardstock using your versafine black inkpad and quickly emboss with your black embossing powder before the ink dries. Heat set and continue stamping and embossing until you have the images you desire for your ornament.
2. I used Farm Animals and Grumpy Penguins from Katzelkraft as well as their accessories stamp set which is awesome to make your little characters come alive !
3. Once you have stamped and embossed, use markers or water colours to add colour to your images.

  
4.  Fussy cut your images out and add more details using a black and also a white fine tip marker from Posca or gel pen etc.


5. I found this pack of four DIY decorate baubles from Spotlight Australia and had the idea to make my own ornaments with little characters and scenes, best bargain ever at $2.50 each pack!


6. Seperate a circle ornament and cut background paper to fit the cardboard circle that goes in the middle of the ornament. Trim any over hanging edges.

7. Start putting your scenes together!


8. Let me introduce you to Snow-tex if you don't already know it, it is made by Decoart and is fabulous for 3D snow effects. Using a paint brush, add snow to the top of your first scene, to the penguins hat and the presents. Use 3D foam mounting tape behind the presents and penguin to create a shadow box effect.


9. For the second scene, I attached the sheep's hat first and used 3D foam mounting tape to give him some depth, then I cut a small length of the christmas light stickers which I bought 60% off at Spotlight, another bargain woohoo!! I wanted it to look like the sheep had the end of the lights in his teeth - pulling the lights down (being a bit naughty) 
10. I used a label maker to make my quotes but you can use small alpha stamps or computer generate your own to suit. 


Here are both scenes side by side ready to put the ornament together. I crumbled up a piece of recycled packaging to represent snow and turning it into a snow globe as well!! 

Add a piece of ribbon to the top once you have popped the two sides together and hang on your tree.


Products used from the store:


Katzelkraft stamps:


Versafine black inkpad
Embossing inkpad
Snowtex by Decoart
DIY Baubles and Christmas Lights stickers - Spotlight Australia
Recycled packing peanut

That's it from me today, enjoy your Christmas and see you all in the New Year.

Don't forget to subscribe, follow along or leave a comment πŸ˜€

Hugs 

Elisa Ablett


'Frosty' by Elisa Ablett

  Hi Crafters, Elisa here from the design team for Ink Art Designs with the first of my 'Christmas in July' projects. For this proje...