Showing posts with label Off the Rails Scrapbooking. Show all posts

Friday, 6 May 2016

Off the Rails Scrapbooking May Blog Hop


Hi Everyone, welcome to the Off the Rails DT Blog Hop!!!

Here is your fun and bright moodboard....


Here is my take on the FUN BRIGHT Blog hop moodboard....a very vibrant and bright rainbow inspired art journal page using Colour Blast Paste and Sprays and Daler-Rowney Acrylic Inks.

I came across this quote from Maya Angelou a while ago and i loved it. It does not cost anything to be happy, supportive and encouraging to someone who may be feeling down or having hard times, that's my take on that quote....


And some close ups of the amazing colour shimmer and shine with Colour Blast Paste and Sprays

Other products used: Black Acrylic Paint, MFT Dies and Stamp set, Gauze, Vellum, Dina Wakely Stamp and stencil,  


Team A will start us off today Friday May 6-8 through Sunday. 

Please visit each blog and leave a comment as your hopping along. 

Elisa Ablett - http://2crazycrafters.blogspot.com.au/... YOU ARE HERE NOW

HEAD ON OVER TO HERE NEXT -
and end here on the OTR BLOG: http://offtherailsscrapbooking.blogspot.com/... 
and leave a comment for your ballot to random draw to win a great prize.


Please don't forget to follow me and leave some love!

Thanks for participating in our blog hop...


Sunday, 17 April 2016

Bohemian Style Oil Burner - Off the Page by Elisa

Hi everyone,

My turn on the Colour Blast blog today with something a little left field...

A bohemian inspired Oil Burner!!! 


Yes you heard right.....

I had an old terracotta oil burner hanging around, i think it was an old op-shop buy and I thought about 'jazzing' it up with Colour Blast products. 

At first it was an experiment because I wasn't sure how the Pastes and sprays would go on the terracotta, but they worked a treat I think. It has retained all the shimmer and shine and was so easy to use!

Here is the final photo of the Oil Burner and i have included a tutorial on how I achieved the Bohemian look or hippie-chic with a romantic shimmering floral design, feathers, twine and beads.


and now for my tutorial - 

Below is a photo of a few of the Colour Blast Pastes and Sprays I used to complete this project - Tangereen Dream, Bling, Deep Water, Envy, Royalty and Just Blue Pastes and Shimmer Sprays can be found here.


To start I cleaned the burner thoroughly and then once dry I sanded the burner back to ensure a smooth clean surface to apply my black acrylic paint.


Next step after it has dried thoroughly is to grab a few smaller stencils, preferably stencils that are very flexible and even better if they have an adhesive back. Because of the curve of the burner, larger thicker stencils would not work at all.


 As you can see from the photos directly above and below I have used different flower stencils to create a flower background design. I have washed and dried the stencils between each colour Paste. 

Also you can definitely see the amazing colour and shine on the black background.  

I must point out here that the top of the burner (where the oil and water goes) was already glazed with what i assume is a glossy heat resistant coat, I am not sure what they used as I bought the oil burner like that. Just make sure if you are attempting a 'revamp' of something that uses a flame and oil that you seek professional advice from a Hardware or Garden Store.


The next step is to use the Shimmer Sprays, at first I sprayed a light coverage of different colours over the black background. Then after that had dried I took the tops of the sprays off and used a paint brush to pick up the intense colour from the bottom of the bottle and let it drip down into the design.  You get an amazing marbled look almost like an Opal.


After you have added your intense coloured drips, please dry thoroughly and then use your choice of a quality Ceramic sealer, or an Acrylic Sealer, Matte or Glaze.

I used Gel Medium and Super Tac Glue to add the thick Garden Twine, this twine has a rough hessian feel to it, once you have a layer of glue down slowly twirl your burner as you gently press down the layers of your twine.


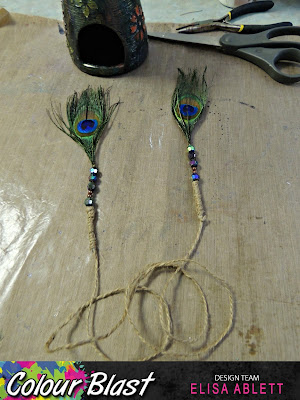
Next iImade the bohemian style 'lariat' which is a necklace or length that does not have a clasp, you have to knot the two ends together. From the photo below you can see I cut the feathers down and stripped them of a few inches of the thin smaller feathers from the length, I then added a stopper near the head of the feather and added my beads. I then put glue on the end of the feather where my twine was to go and slowly wound and twisted the twine in a spiral to finish off the ends of the feather.


Here is a finished photo of the Lariat to finish off the burner.


And some more photos of the finished product after winding and tying the Lariat around the burner. Safety first people!!!  Always watch any oil burners or open flames around your house.


Thanks for stopping by today, I hope you have enjoyed my tutorial.

please leave some love in the comments, we love to hear from you all.....


Click on the link below to discover all the amazing colours for the 
Colour Blast Pastes, Sprays and Embossing Powders


Colour Blast Australia

Thursday, 4 February 2016

Off the Rails - Grungy Romance Tutorial

Hi Everyone,

Elisa here sharing the Mixed Media tutorial that I completed for  Off the Rails Scrapbooking Blog. I thought that I would share the tutorial post here as well. I wanted to show you all a different way of using chipboard to create a mixed media background for your layouts plus share a tip of using tissue paper to add texture and dimension.

Here is the February Challenge mood board that I used as the inspiration for my layout.

 
and here is the layout I created for the February Challenge and my tutorial, I don't usually work with pinks etc having two boys but I loved the idea of creating something a little grungy yet still within the theme of the mood board 'Romance' hence all the love hearts and xoxo and the recent photo of my husband and I.


Alright its tutorial time !!

Instructions are under each photo.

Step 1 - Add Gesso to your page  (can be messy and bumpy) with a palette knife and dry well with a heat gun.

Step 2 - Once dry lay some smaller chipboard pieces (or wood veneer, or die cuts etc) onto the page and use your favourite colour sprays, spray directly over the chipboard pieces using them as a mask, it may seep under a little bit but don't worry!!


Step 3 - Keep spraying over the top of the pieces with another colour, I used black and white as well as bright pink. Doesn't have to be a fine mist can be larger spots and splats. Dry thoroughly after each spray of different colour leaving your last spray (of black in my case) still slightly wet.


 Step 4 - Once dry take the wood veneer or chipboard pieces off and place your larger chipboard piece on the page and wet your brush with gesso, paint all over the chipboard piece making sure you go over onto your page, using your piece as a mask again, the gesso will blend with the spray and create multi tones of greg, white and black once you lift off the chipboard piece after painting on it and I made sure the laden brush went through the gaps onto the page. I also used a small spray bottle filled with water and gave it a little spray here and there to make the paint a little more fluid. AND YES it gets a little messy, don't worry!!

Step 5 - As you can see from the close up above, the chipboard 'mask' has created a textured pattern as part of your background.


Step 6 - I repeated step 5 a few more times around my page, added a few more black sprays (especially some larger splats). Also at this stage I sprayed white onto the page and created drips by tilting the page.


Step 7 - The tissue paper!! I folded my tissue paper into a few layers and punched out flower shapes (to bring out the flower elements of the mood board), I separated the flowers into singles and stuck them to the page whilst the white spray was still wet, they soaked into the background quite well.


Step 8 - I stuck down my larger piece of chipboard and added more splats of colour using my bright pink and black sprays, leaving space for where my photo was to go. I just undo the lid, grab the top with the inner tube attached and just lightly tap on the tube with my finger, it creates awesome splats using the ink left in the tube.


Step 9 - Stick the smaller pieces of wood veneer back on in almost the same position as they were but not quite so that you get an almost a shadowed effect. I also added a few more elements to the page including my photo and paper layering and black thread. At this stage I also used a white pencil or you can use a white pen to trace very lightly around the tissue paper flowers just to make them stand out a little bit.


 And the above photo is the finished product. I hope you have enjoyed the tutorial. Don't forget to leave some love....

Thanks

Elisa xx


'Frosty' by Elisa Ablett

  Hi Crafters, Elisa here from the design team for Ink Art Designs with the first of my 'Christmas in July' projects. For this proje...