Sunday, 17 April 2016

Bohemian Style Oil Burner - Off the Page by Elisa

Hi everyone,

My turn on the Colour Blast blog today with something a little left field...

A bohemian inspired Oil Burner!!! 


Yes you heard right.....

I had an old terracotta oil burner hanging around, i think it was an old op-shop buy and I thought about 'jazzing' it up with Colour Blast products. 

At first it was an experiment because I wasn't sure how the Pastes and sprays would go on the terracotta, but they worked a treat I think. It has retained all the shimmer and shine and was so easy to use!

Here is the final photo of the Oil Burner and i have included a tutorial on how I achieved the Bohemian look or hippie-chic with a romantic shimmering floral design, feathers, twine and beads.


and now for my tutorial - 

Below is a photo of a few of the Colour Blast Pastes and Sprays I used to complete this project - Tangereen Dream, Bling, Deep Water, Envy, Royalty and Just Blue Pastes and Shimmer Sprays can be found here.


To start I cleaned the burner thoroughly and then once dry I sanded the burner back to ensure a smooth clean surface to apply my black acrylic paint.


Next step after it has dried thoroughly is to grab a few smaller stencils, preferably stencils that are very flexible and even better if they have an adhesive back. Because of the curve of the burner, larger thicker stencils would not work at all.


 As you can see from the photos directly above and below I have used different flower stencils to create a flower background design. I have washed and dried the stencils between each colour Paste. 

Also you can definitely see the amazing colour and shine on the black background.  

I must point out here that the top of the burner (where the oil and water goes) was already glazed with what i assume is a glossy heat resistant coat, I am not sure what they used as I bought the oil burner like that. Just make sure if you are attempting a 'revamp' of something that uses a flame and oil that you seek professional advice from a Hardware or Garden Store.


The next step is to use the Shimmer Sprays, at first I sprayed a light coverage of different colours over the black background. Then after that had dried I took the tops of the sprays off and used a paint brush to pick up the intense colour from the bottom of the bottle and let it drip down into the design.  You get an amazing marbled look almost like an Opal.


After you have added your intense coloured drips, please dry thoroughly and then use your choice of a quality Ceramic sealer, or an Acrylic Sealer, Matte or Glaze.

I used Gel Medium and Super Tac Glue to add the thick Garden Twine, this twine has a rough hessian feel to it, once you have a layer of glue down slowly twirl your burner as you gently press down the layers of your twine.


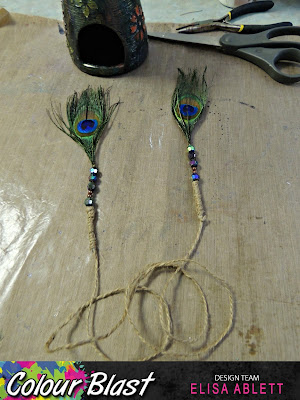
Next iImade the bohemian style 'lariat' which is a necklace or length that does not have a clasp, you have to knot the two ends together. From the photo below you can see I cut the feathers down and stripped them of a few inches of the thin smaller feathers from the length, I then added a stopper near the head of the feather and added my beads. I then put glue on the end of the feather where my twine was to go and slowly wound and twisted the twine in a spiral to finish off the ends of the feather.


Here is a finished photo of the Lariat to finish off the burner.


And some more photos of the finished product after winding and tying the Lariat around the burner. Safety first people!!!  Always watch any oil burners or open flames around your house.


Thanks for stopping by today, I hope you have enjoyed my tutorial.

please leave some love in the comments, we love to hear from you all.....


Click on the link below to discover all the amazing colours for the 
Colour Blast Pastes, Sprays and Embossing Powders


Colour Blast Australia

Sunday, 10 April 2016

Hi everyone,

Just thought I'd share my latest blog post over on the Colour Blast Blog. http://colourblastaust.blogspot.com.au/

I am sharing a layout called 'Water Lillies' I created using Royalty and Sunshine Colour Blast Paste and Apple of my Eye, Sunshine and Royalty Shimmer Sprays all of which can be found on the Colour Blast Australia website. Click on the links and see the amazing colours available.

I was going through my photo's the other day and came across this photo of a couple of gorgeous water lillies that I took near my Mum's property and thought it's perfect for showcasing the Royalty and Sunshine Colour Pastes and Sprays.


Here is a close up of the gorgeous shimmer and shine of the pastes and sprays and of the details of the Oriental inspired screens, rub-ons and stamping.


Now lets go through some of the techniques that I used to create my layout.

Firstly, I gathered together the Colour Blast Pastes and Sprays I needed to go with my photo along with my stencil and laid out a rough plan for my layout.


Here I used the very tip of the palette knife to control the placement of the different coloured Pastes on my Stencil. After each flower was completed I washed and dried the stencil and moved it around my page as required.


While I waited for the background to dry I decided to work on my Oriental inspired frames. I found some gorgeous tissue paper that went beautifully with my colour scheme. As you can see from the photo, I turned the Chipboard frames upside down and glued them to the tissue paper. Once dried I cut around the frames, I liked the look of a couple of the screens left with the tissue paper stretched over the top of the frame and had the great idea to create my own Asian inspired paper screens. To get a smooth edge I used a bit of glue on my finger and smoothed it over all the edges.


Next step !! gather together all your old rub-ons and grab your desired stamps, using Black Versafine ink stamp in a mirror image on both screens, you can achieve this by stamping the image on the left screen on top of the tissue paper. Then grab the right screen - turn it over- then stamp the image on the underside of the right screen, so when you turn it over it becomes the mirror image of the left screen. You can only do this with certain paper types like tissue paper.


Here is the left screen.


and here I am stamping the underside of the right screen.


The next step is to Spray over the top of your Stencilled and dried lillies, I sprayed then used a spray bottle filled with water to disperse the colour around my page, tilting the page left and right at times to spread the colour.


Once dry I decided to do a little more background stamping with my chosen stamps, I also decided to take a bit of the intensity of the ink off the stamp by stamping on my mat first then stamping on my page, works a treat!


Let the ink dry completely before this next step, 'roughly' add your desired rub-ons to your page - you do not have to be concerned if its not particularly neat, I wanted mine to look weathered and worn. It is adding extra texture and depth to your page.


Time to put your layout together!  Firstly stick your frames down on your page, arranging them in a central position. Also I decided to put one of the frames on a tilt in the middle to add a little interest drawing the eye to the photo in the middle. I framed the photo in a chipboard frame, covered in black ink just to further showcase the photo as the background is quite bright and busy.


Here is the finished layout! there is plenty of shimmer and shine from the Colour Blast Products and I think a new purpose for all those rub-ons I have in my stash.


By Elisa Ablett

Saturday, 2 April 2016

Off the Rails Scrapbooking - April Challenge By Elisa Ablett DT

Hi everyone,

Elisa again, sorry to bombard you with layouts in the last few days, but blogger is working for me today and I'm running with it!!

I just wanted to share with you the double Art Journal page I was inspired to create as my Design Team piece by the moodboard for Off the Rails Scrapbooking - April Challenge
Here is my Art Journal double spread -


And some close ups of the shimmer and glimmer of the Colour Blast Pastes and Sprays and Tim Holtz Distress Stains. Stay tuned for my Tutorial showcasing how I completed the background for this Art Journal page on the 5th April 2016.


Thanks for stopping by, make sure you leave some love and stay tuned for my tutorial
on the 5th April :-)


Scrap the Boys - April Challenge - My Daddy My Hero by Elisa

Hi everyone, 

Elisa here again with a layout i created for the Design Team reveal at Scrap the Boys Challenge Blog - April challenge

I was waiting for a time to use the new collection from Kaisercraft called Coastal Escape and gorgeous Chipboard from Scrapmatts.


Here are some close ups of the embossed chipboard pieces and the layering which includes plastic packaging (net) from a toy and cut outs with layers of paper. 


Products used:

Colour Blast Sprays and Embossing Powder - Envy and Deep Water
Kaisercraft Coastal Collection
Kaszazz Background Stamp
Kaisercraft Background Stamp


Thanks for stopping by the blog today, make sure you leave a comment.


Kraft Plus - April Challenge Design Team Layout - By Elisa

Hi Crafty Friends,

Good News - It's the start of the month and that means a new exciting challenge over at our favourite Kraft Challenge Blog

Make sure you click on the link and head on over and be amazed at all the different design team projects for the release of this challenge.

This is the layout that created - 

I used a new stamp set from Prima Marketing (Ink and Layer) Flora Set, Chipboard frame from WOW Words or Whatever, White Punchinella, Kaisercraft Rub-on's and Kaisercraft texture script stamp and sequin bow from D-lish.

But i really want to rave about the new pearlescent Acrylic inks from Daler-Rowney that i recently acquired, amazing colour, vibrancy and just plain awesome to work with. I used the white and black inks for this layout.


Here is a close up of the shimmer and shine of the inks.


Thanks for stopping by today, make sure you leave some love...

Elisa xx


Friday, 1 April 2016

Turtle Soup Blog Hop April 1-3 'SPRING'

TURTLE SOUP BLOG HOP APRIL 1-3


Hi everyone….. welcome to the Turtle Soup 'Spring' themed Blog Hop. Hope you enjoy everyone’s inspirational and creative projects. Here is the full list in case you lose your way. At the end please head back to the Turtle Soup Blog to leave a finishing comment to get your ballot to win a random prize. Enjoy and off you go hopping…….. thanks

1. Sara - (using Turtle blog) http:/.../turtlesoupmagazine.blogspot.com/
11. Elisa http://2crazycrafters.blogspot.com.au/  - (YOU ARE HERE)


..................................................................................................................


Hi, Elisa here with my layout for the Spring themed Blog Hop for Turtle Soup, I loved this photo I took of a Gerbera flower, so bright and pretty and colourful. I took inspiration from the colours and of course put my mixed media spin on it...

Products used : Colour Blast Australia 'Sunshine' Paste, Colour Blast Tangareen Dream, Sunshine and Apple of my Eye Shimmer Sprays, Stamp-it Stamps, Kaisercraft Rub-ons, D-lish Punchinella, Heidi Swapp title and Adorn-it mini letters.


You can see from the close-ups the shimmer and shine from the shimmer sprays and also the rub-ons and stamping. If you are like me and have quite a few packs of rub-ons that you may have in your stash that you haven't used, dig them out and use them in your backgrounds!!


The black rounded frame is hand drawn - around a square fiskars template which I moved slightly to the left or right on each trace around...


Thanks for 'hopping' by today, don't forget to leave some love in the comments and head back to the Turtle Soup Blog to leave a comment to get your ballot to win a prize....

'Frosty' by Elisa Ablett

  Hi Crafters, Elisa here from the design team for Ink Art Designs with the first of my 'Christmas in July' projects. For this proje...